
GTM 101: The Basics
Google Tag Manager (GTM) is a free management system that lets you easily add, delete and manage tags on your website or mobile app. One of the best things about it is that managing tags doesn’t require any knowledge of code writing. All you need is some basic code installation on your site/app – this helpful GTM Quick Start Guide will walk you through it. From then onwards, you can easily collect all sorts of useful information from your visitors and users.
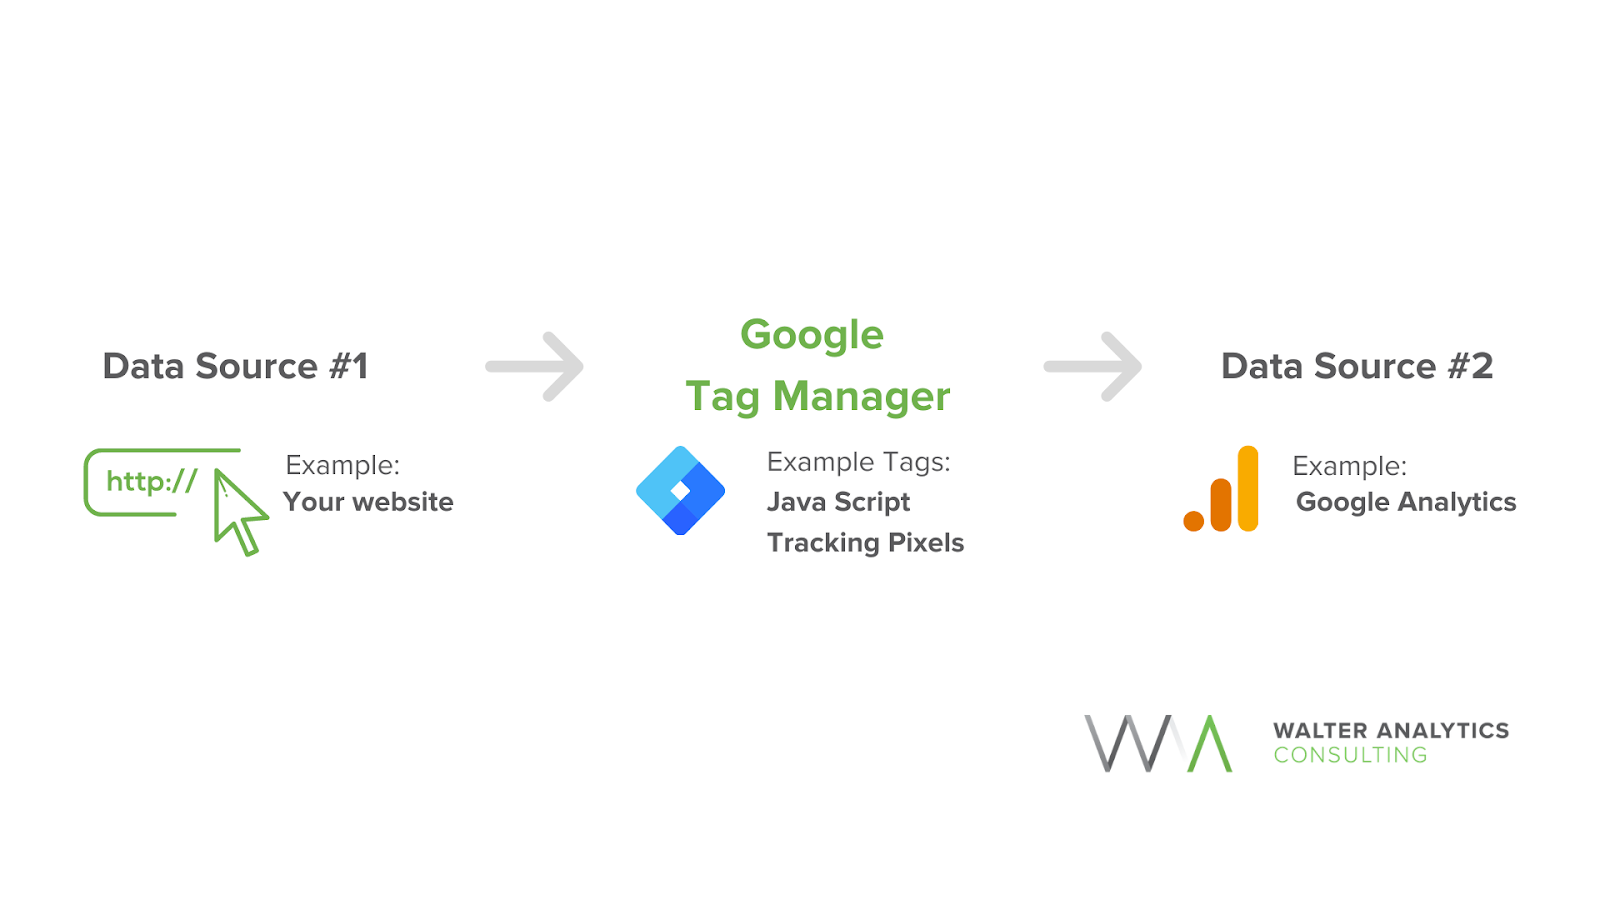
GTM, being a Google product, easily connects with other Google systems, such as Google Analytics. Below, we’ve illustrated the flow of data from the source (your site/app) to Google Analytics, via GTM. This is great for busy marketers who want to easily oversee the whole back-end tracking process without having to hire a web developer! Plus, using GTM significantly reduces the likelihood of any coding errors and website breakdowns.
In this article, we’re going to give you a few helpful tips about how GTM works, why you should use it and how to get started with some basic event tracking. By the end of this article, you’ll be feeling confident with GTM and ready to get tracking!
Three Main Components of Google Tag Manager
Google Tag Manager is easy to use once you know the basics. Ultimately, it comes down to three main components; tags, triggers and variables. We’re going to explain what these are and how to use them so you can get tracking with confidence!
What are tags?
Tags are tracking pixels or little bits of code embedded in your website or app. Tags fire in response to a trigger. In short, they tell GTM what to do when a trigger occurs.
Some examples of tags are:
- Google Analytics UTM code
- Facebook pixel
- Adwords remarketing code
- Heatmap tracking code (Hotjar, VWO)
Often, tags are used to send information from your website to a third party, like Google Analytics. This kind of information sending is important as it allows you to see behavioural patterns and trends of your site/app users, which you can then use to make improvements and, hopefully, increase your conversions.
What are triggers?
Triggers tell GTM when to fire a specific tag. Triggers respond to certain types of events, like when a website visitor clicks a button, views a product page or downloads a form. Every tag has to have a trigger in order to happen. You can test these in GTM before you publish them on your website/app.
What are variables?
Variables are additional information that GTM may need for the tag and trigger to work. For example, if a product name changes, variables account for that to ensure tags and triggers still occur. That way, you don’t have to manually reset tags and triggers you’ve already created on your site/app.
Why Should I Use Google Tag Manager?
GTM offers the chance to save a lot of time managing the tags on your website/app. As with any new tool, it may take a little time to get used to, but it is absolutely worth the effort. To keep you motivated on your GTM learning curve, we’ve put together what we see as the main reasons why you should use GTM.
Fast Installation of Tracking Code
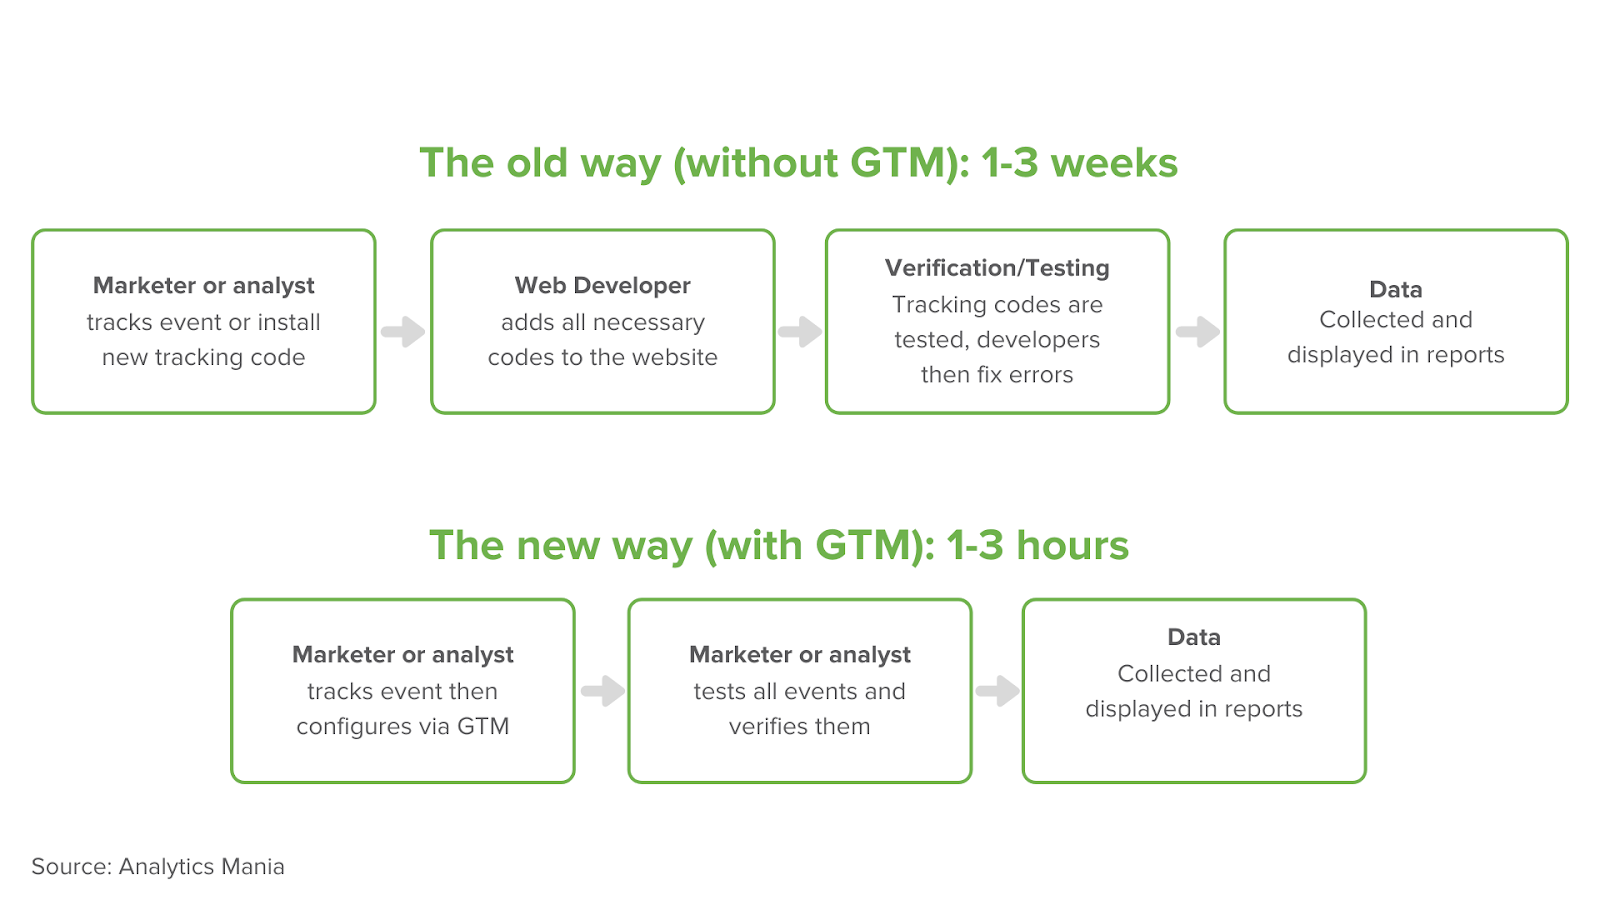
Before GTM, installing marketing-related tracking codes required a web developer. From deciding to use a new marketing platform to actually using that platform could take several weeks, depending on your web developer’s schedule. With GTM, however, you can speed up the process dramatically and be using your desired marketing platform almost instantaneously.
To help you visualise the time-saving benefit of using GTM, we’ve put together a comprehensive illustration below. By removing the need for a web developer, you’re much more self-sufficient and can work on your own schedule.
Control in One Dashboard
Before GTM, all tracking codes were coded directly in the website’s source code, and across different files. That means any change, however minor, would need you to find all the tracking codes and update them one by one. Not only was this time wasting, but it increased the chance of human error and, ultimately, of a website breakdown.
With GTM, you can control and update tags all from one easy-to-use dashboard.
It's Free
As with most Google services, GTM offers a very extensive free version. We think it’s great for most businesses, but if you need a little extra niche capability, there is a paid version available.
Easily Set Up On-Click Events
On-Click events are a great way to help determine which links or buttons your users are clicking, especially if you have several call-to-action buttons on one webpage. Before GTM, we would need to create on-click codes for each click event and give these to a developer for a hardcoding to each button.
With GTM, the days of back-and-forth communication are cut down to minutes. Now, we have a much faster way to find out which call-to-action buttons are performing well on our website.
Simplified Preview and Debugging Before Publish
GTM allows you to preview your tags and debug them in real time. This helps you ensure your tags are firing at the right time as well as make changes instantly.
Beginner Tag Manager Mistakes to Avoid
Now that you’ve got a better idea of how GTM works and why you should use it, we’re going to outline a few of the common mistakes to avoid when you’re just starting out with GTM.
Not Previewing Your Container Before Publishing
We strongly recommend previewing your container before publishing. The container is, essentially, a holder for all the tags on your website and it’s vital to ensure everything is correct before adding this to the source code of your site.
Don't Test in Production
It’s best to do testing on a staging website for any major changes, as occasionally you can break your website if you push the wrong code. Ensure you have a strong UAT process as part of the preview and testing phase.
Ensure Limited People Have Access to Your GTM Account
Having a GTM container on a website yields a lot of power, and with that comes a lot of responsibility for website security and data privacy. Ensure that only a limited number of users have GTM container Publish ability and regularly check the Admin users in the GTM User Management tab.
Avoid Over-Tracking Events on Your Site
Tracking everything – from every click to the slightest scroll in your website can slow down your website’s loading time. Aside from that, over-tracking events can prevent you from identifying the most relevant data. As such, we highly recommend identifying key interactions and events on your website and adding the tracking only for these events.
Not Using Variables
GTM has a vast range of built-in variables to choose from such as Clicks, Form Submissions, Pages, Scrolls and many others. Remember to explore the list of in-built variables rather than creating your own. You’ll save yourself both time and energy by doing so.
Being Afraid to Ask for Help from a Developer or a GTM Expert
GTM may remove the need for a web developer, but that’s not to say a developer wouldn’t be helpful. Whilst GTM is easy to use, you may find that you need help from a professional if you need more enhanced tracking or are having trouble using the more advanced GTM capabilities. Don’t be afraid to contact a web developer for help making the most of GTM.
Implementing Basic Events Tracking [With Examples]
Next, we’re going to get you started with some basic tracking and give you some examples to help you set up your own tracking events.
Scroll Tracking
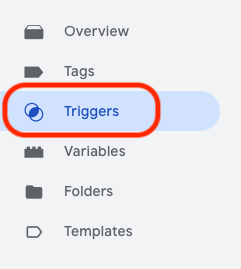
By default, the scroll tracking capabilities of GTM are disabled. To enable them, go to Google Tag Manager > Triggers > New > Scroll Depth and input the following:
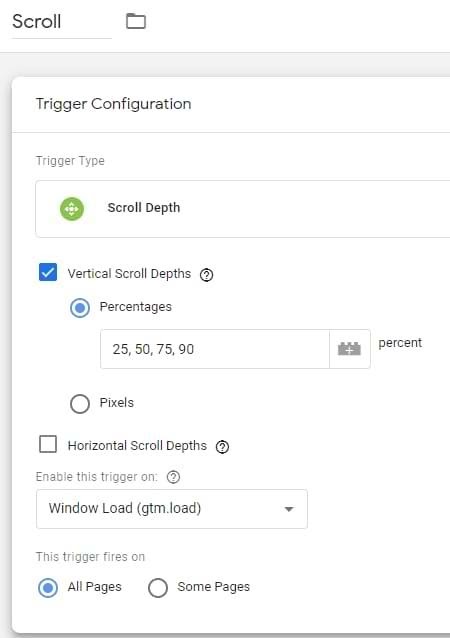
Then save the trigger.
You can modify the percentage or apply other tweaks but the configuration above is the most commonly used. You can then add links to a tag to fire events to your Google Analytics when users scroll. NOTE: This isn’t needed in Google Analytics 4 as it’s an auto-tracked function.
Tracking Standalone Button Clicks
First, let’s define the components of this event.
- Button – this defines where and what kind of clicks you measure. For example, a Shop Now button on your e-commerce website or even a cookie banner.
- Google Tag Manager – this is the middle layer between the button and your Google Analytics dashboard. With GTM, you set up how your controls will be measured.
- Google Analytics – this is your final dashboard. It’s where you’ll study your data. You can, for example, learn how many people clicked your button and on what site they clicked your button.
Step#1: Add a Unique CSS ID to Your Button
Let’s say you have six buttons on your website. All buttons have the ID id=” button”. However, you only want to track one button with GTM. To do this, you need to give one of the five buttons a different ID. For example id=”subscribe-button-menu-com”.
The easiest way to check the ID is through Google Chrome. To do this you should:
Right-click on your website > Select Inspect > Click on the icon mark in the screenshot > Hover over your button.
You should be able to see the ID of your button. If you can’t find an ID, that means the button doesn’t have one yet.

Step#2: Define the Variable
Now that you know the ID of your button, you need to define the variable in GTM. To do this, open Google Tag Manager > Variables > Configure > Add a variable of the type Click Element

Step#3: Assign the Trigger
After defining the variable, you need to assign a trigger to it. To do that, open Triggers > New.
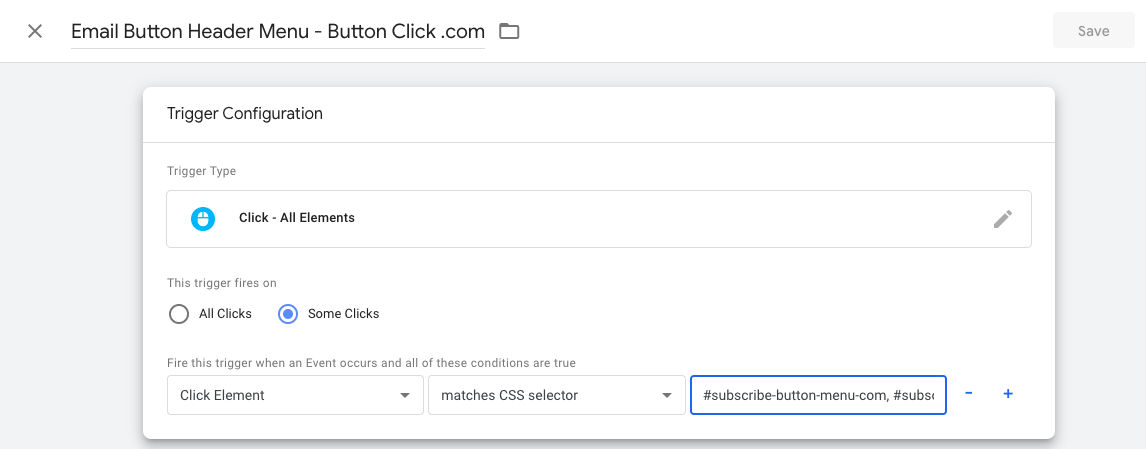
Give your trigger a valid name and configure it as below:
- Trigger Type: All Elements
- Trigger: Fires on Some Clicks
- Condition: Element, matches CSS selector. Add the ID that you assigned to your button with the syntax #ID, #ID* (for example #subscribe-button-menu-com, #subscribe-button-menu-com*)
Save your trigger.
Step#4: Configure the Tag.
Next, open Tags > New.
Give your tag a valid name and configure it as below:
- Tag Type: Google Analytics: Universal Analytics
- Track Type: Event
- Event Tracking Parameters: You can set these values as you like. Here are some best practices.
- Category: This is the name and how you will see the event in Google Analytics. For example, ‘Header Button’.
- Action: For instance, Button Click
- Label: For example {{Page URL}}
- Value: Empty
- Non-Interaction Hit: False
For the Google Analytics settings: Add your Google Analytics account {{Google Analytics Settings}}. Leave Enable Overriding Settings in This Tag unchecked.
- Triggering: Select your trigger from the previous step.
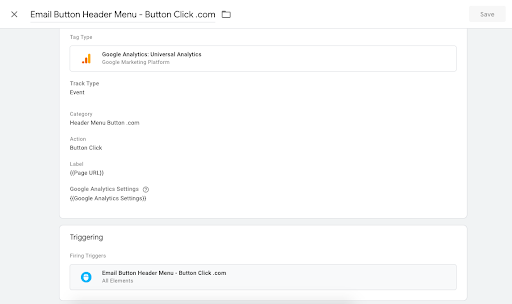
Save your tag.
Tracking Lead Form Submissions
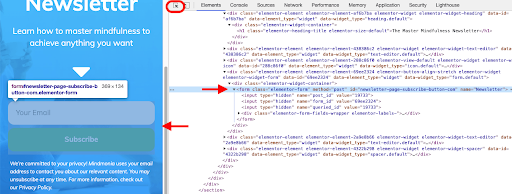
Step#1: Add a Unique CSS ID to Your Form
Assign the ID to the entire form, not to the ‘Submit’ button only. As with tracking a button, the form(s) you want to track must also have a unique ID.
Let’s say you have three forms on your entire website. All forms have the same ID id=form. But you just want to track one of the forms with GTM. In this case, you need to give one of the three forms a different ID. For example id=”newsletter-form”.
To check the form ID using Google Chrome you should: Right-click on your website > Select Inspect > Click on the icon mark in the screenshot > Hover over your button. Your form ID should now be visible. If you can’t find an ID, it means the form doesn’t have one. If you can find the ID, ensure it has a unique ID name.
Step#2: Define the Variable
Now that you know the ID of your button, define the variable in GTM. Open Google Tag Manager > Variables > Configure > Add a variable to the Form ID.
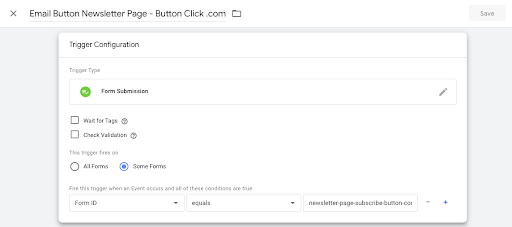
Step#3: Assign the Trigger
After defining the variable, assign a trigger to it. To do that, open Triggers > New.
Give your trigger a valid name and configure it:
- Trigger Type: Form Submission. This ensures that you only measure button clicks that lead into form submissions and not button clicks that lead into error messages
- Checkboxes: Leave unchecked
- Trigger: Fires On Some Forms
- Condition: Form ID, equals. Add the ID that you assigned to your form on your website with the syntax #ID, #ID*
Save your trigger.
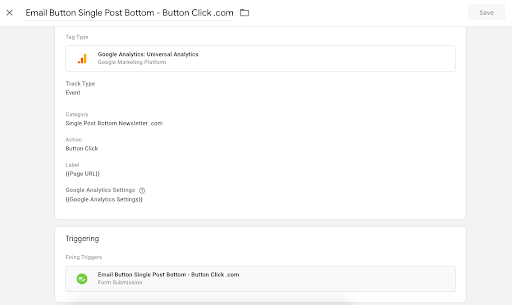
Step#4: Configure the Tag
Open Tags > New.
Give your tag a meaningful name and configure it. In our example, we went with the following:
- Tag Type: Google Analytics: Universal Analytics
- Track Type: Event
- Event Tracking Parameters: You can set these values as you like. Here are some best practices.
- Category: This is the name and how you will see the event in Google Analytics. For example, ‘Header Button’.
- Action: For instance, Button Click
- Label: For example {{Page URL}}
- Value: Empty
- Non-Interaction Hit: False
For the Google Analytics settings: Add your Google Analytics account {{Google Analytics Settings}}. Leave Enable Overriding Settings in This Tag unchecked.
- Triggering: select your trigger from the previous step.
Save your tag.
Understand the Growth Opportunities of Your Website.
Walter Analytics Can Help.
Google Tag Manager makes it easy to manage your website tags from a central dashboard, which is important for tag transparency and security. Rather than needing to ask your website developers and paying for hours of time whenever you want to integrate a new tag to your website, you can do this internally in minutes with Google Tag Manager.
Walter Analytics also offers a comprehensive tagging and tracking audit where we will go through your website and find which tags are currently harvesting information from your users and which ones can be cleaned up and optimised. Most websites have several, if not dozens of tags that are no longer in use, often costing website speed and sending data about users to non-authorised applications. With legal frameworks such as GDPR and stricter privacy laws, you want to ensure your website is following best case practices.
We also offer this service to agencies on a white label basis.